Tuesday, December 27, 2016

Leia's Legacy: Cinnamon Rolls

Hey everyone. I know it's been a while, and that I managed to miss both of the major food-oriented holidays this year, but the truth is, like many people, I work retail. Yes, I have a programming position, but I'm technically in retail. So spare time doesn't exactly happen for people in that field around the end of the year. In all honesty, I wasn't going to be on for another week or so as we wrapped up the last of the Holiday Hullabaloo (pun somewhat intended), but today kind of changed that.

As you're likely all aware by now, the beloved Carrie Fisher has jumped to hyperspace. That wasn't exactly what I wanted to hear today. While I may have never met Ms. Fisher in person, she meant a lot to me. I literally grew up watching Star Wars, incessantly rewatching my dad's old VHS collection of the original trilogy every morning that I could weasel in some TV time. Let me tell you something, it takes some serious confidence to go parading around enemy space ships, wearing what is essentially an intergalactic potato sack, barking orders at people you just met, and throwing insults at some of the most powerful figures in the known galaxy. But the thing is, it wasn't just her screen character that was strong. It was her personal character as well. 

Flash forward nearly 40 years, and Ms. Fisher was brave enough to take back up her old role, even though she knew she was going to catch all kinds of flak for not having the same young body people are used to seeing on Princess Leia. More so than that, rather than letting the critics get her down, she stood up and told them to take their vain, hateful, hurtful comments and stuff them right into the garbage chute, because she, like everyone else, ages, and there's nothing we can do about. Honestly, I have to admire someone who is willing to be who they really are, and who can tell those who don't like it to kiss their big, hairy Wookiee. That's not exactly an easy thing to do.

So yeah. I'm... I don't know. I don't really know how to words right now. I don't really like to talk about things that I'm feeling. I usually process them through other means. When I'm anxious, I knit. When I'm conflicted, I'll paint. When I'm... pretty much anything else really, I'll cook. I don't really know why. 

What I do know is that where I come from, when someone passes on, those that care show up with food for the family thereof. I may not be able to show up to (California? Is that where her family's at? All the movie-type-things go on in California... right?) with a crockpot full of dinner, but I thought maybe I could do so symbolically. Food never makes the hurt go away, but sometimes it can make the hurt less. And right now, I know there's a lot of people mourning. 

Out of respect for the departed, I'm going to refrain from my usual joke cracking.


Ingredients:

  • 2 sheets Puff Pastry, Thawed
  • 1 8oz Block Cream Cheese, Softened
  • 3 cups Light Brown Sugar
  • 3 tbsp Ground Cinnamon

Equipment:

  • 9 x 13 Baking Pan
  • Spray Grease
  • All Purpose Flour, For Dusting
  • Spool of Dental Floss
  • Mixer & Bowl

Honestly, I've never made cinnamon rolls from anything more than a pop-open can in my life. But at the same rate, I knew I had to do something fairly specific for this. I figured something reminiscent of Leia's trademark hairstyle would work. 


Mix together the cream cheese, brown sugar, and cinnamon until well combined. Spread evenly over the puff pastry, leaving a small border at the edges. Don't overdo it on the filling, though. There's a good chance you'll wind up with extra. Roll each pastry up, making sure that the starting side is tight. Use the dental floss to cut through the dough logs (it works best if you place the log on top the floss, cross the floss ends like you're going to tie it, and then just pull), making discs about a half inch thick. Put all the discs flat in the baking pan, and bake at 350 until golden brown.

Here's hoping that maybe somebody out there will see this and know that they're not alone in their sadness. Ms. Fisher, do me a favor and say "hello" to Alec Guinness ("Old Ben" Kenobi), Kenny Baker (R2-D2), Peter Cushing (Governor Tarkin), and Christopher Lee (Count Dooku / Darth Tyranus).  I'm sure you'll be in good company.


Sunday, October 30, 2016

Halloween Recipe Rush Day 8: Apple Dumplings

Hey everybody! Welcome to Day 8 of our Halloween Recipe Rush! Since tomorrow is Halloween, we figured we'd give you all a jump start on loading up on sugar by posting a variant of a tasty dessert my mom used to make for me. She apparently found the base recipe for Mountain Dew Apple Dumplings while floating about on the internet one day, but we're going to take that to the next level.


Ingredients:


  • 1c Granulated White Sugar
  • 1c Pumpkin Spice Sugar
    • You can buy this pre-made, but it'll likely wind up being expensive. I reccomend using the pumpkin spice sugar we made earlier this week here
  • 2tbsp Ground Cinnamon
  • 1/2c Butter or Butter Substitute, Melted
  • 2 Apples
    • I used Granny Smith apples, but you can use whatever kind you like
  • 2 Cans Of Croissant Dough
  • 1 Can Mountain Dew
    • My husband has informed me that soda is made with entirely different recipes depending on what country you're in. For the record, the Mountain Dew used here is the plain old "green" American kind; the kind made with high fructose corn syrup. For what it's worth, I did manage to get my hands on some of the "green" kind made with sugar instead of corn syrup many years ago and used it in a similar recipe. It turned out well.
Equipment:

  • 9"x13" Pan
  • Spray Grease
  • Oven
  • Mixing Bowl & Spoon
  • Knife

Cut the apples into 8 pieces each, being sure to get rid of the core. Make sure that none of the pieces has any seeds remaining in them. Optionally, you can decide to peel the apple pieces as well. Wrap each apple piece in a croissant dough triangle, and place them into the generously greased pan.


In the mixing bowl, combine both kinds of sugar, the cinnamon, and the melted butter. The idea is to have a thick paste; feel free to add more granulated sugar as needed. Spoon the paste over the tops of the wrapped apple pieces, spreading it to mostly cover each piece. Once you've used all the sugar paste, open the can of Mountain Dew and pour it into the space between the dumplings. Don't pour it over the top, or else you'll wind up knocking all the sugar paste off.

Contrary to popular belief, these are not
barbecue wings. Confusing, I know. 


Bake for 20 minutes at 350F or until croisant dough is fully cooked. The sugar paste should form a nice crunchy crust on top the dumplings. Note that the Mountain Dew "sauce" will thicken up a bit as the dumplings cool down.

How did yours turn out? Be sure to let us know in the comments below! Also, this week is our Halloween recipe rush, so be sure to like us on Facebook and follow us on Twitter to make sure you don't miss a single one.

Saturday, October 29, 2016

Halloween Recipe Rush Day 7: Graveyard Cupcakes

Hey everyone. I know this recipe is coming at you a little bit later in the day, and I apologize. Wound up having to fight with my oven. It decided to activate Sabbath mode, which I have no clue how to use or turn off or anything. After an eternity of fighting with it, the oven randomly decided to revert back to normal mode, and I was able to get back to cooking.

So, without further ado, Graveyard Cupcakes!


Ingredients: 

  • Brown/Black Cake Mix
    • Any of the zillion varieties of chocolate will work
  • Ingredients Called For On Back of Cake Mix
  • White Almond Bark / Wilton Candy Melts
    • Henceforth referred to as "chocolate" for ease of writing
  • Brown/Black Frosting
    • Again, any variety of chocolate will work
  • Green Sugar Sprinkles
Equipment:

  • Microwave-Safe Tall Coffee Cup
  • Microwave-Safe Piping Bags & Tips
  • Skull & Skeleton Candy Molds
  • Icing Spatula
  • Muffin Pan
  • Oven
  • Muffin Pan Liner Cups
  • Small Bowl

The actual cupcake part of this is fairly easy. Follow the instructions on the back of the cake mix for creating the batter, and then divvy it up into the muffin pan liners in the pan. Bake according to directions on box.

While the cupcakes are baking, melt the chocolate according to instructions, and carefully pipe it into the candy molds, tapping the mold against the work surface to remove any air bubbles. Note that if your candy molds are particularly deep, like my skull molds were, you'll want to fill them only partially full, or else they will be difficult to eat. I filled the skull molds only half way full. Pop these into the fridge until the cupcakes are done.

I didn't use the rib cage or skull on the skeleton molds
because the pieces were big enough to have dominated
the cupcakes

Let the cupcakes cool completely, and then apply a very thin layer of frosting to the top of them. Just be careful not to make it too thin, or else you'll wind up tearing up the tops of your cupcakes. Place just enough green sugar sprinkles into the bottom of the small bowl to cover the bottom of it. Carefully and gently roll the tops of each cupcake in the green sugar sprinkles, making sure not to hit the sides of the bowl. Add more sugar sprinkles to the bowl as needed.

Carefully pop the candy bits back out of the mold, and place them on the cupcake tops using a wee bit of frosting to adhere them.

How did yours turn out? Be sure to let us know in the comments below! Also, this week is our Halloween recipe rush, so be sure to like us on Facebook and follow us on Twitter to make sure you don't miss a single one.

Friday, October 28, 2016

Halloween Recipe Rush Day 6: Nightmare Before Christmas Cookies

Welcome to Day 6 of our Halloween Recipe Rush. Day 6. That means we've been turning out recipes every day for almost a week now, and you all have been breaking record after record keeping up with us. We gained a whole hundred likes this week, and the week's not even over! Crazy isn't it?

Today we're going to go with something inspired by that nostalgic old movie, The Nightmare Before Halloween.


Ingredients:

  • Sandwich cookies
    • I used Oreo cookies. Your standard grocery store Oreo knockoffs will work. Or pretty much any cookie about the same size.
  • White Almond Bark or Wilton Candy Melts
  • Black Almond Bark or Wilton Candy Melts
    • For ease of writing, hence forth both colors of this will be referred to as "chocolate"
Equipment:
  • Candy Molds
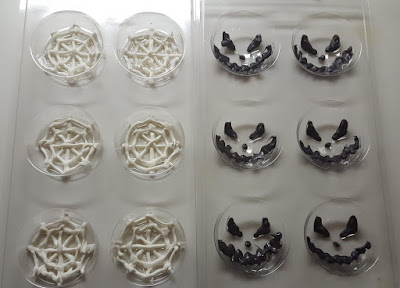
    • The ones I used here are two Celebrate It molds that Michaels sold with their Halloween seasonal stuff this year. If you can't get ahold of these or something similar, you can freehand the chocolate directly onto the cookies. Just apply the chocolate in reverse order from what's listed below.
  • Microwave Safe Piping Bags and Microwave Safe Candy Decorating Tips
    • Wilton has you covered. Pick up some of their disposable piping bags and this tip set. Whatever you do, do not use conventional metal piping tips in your microwave. You're cooking here, not making a Michael Bay film.
  • Tall Microwave-Safe Coffee Cup


Wilton is great, really. They have instructions on how to properly melt and use their candy melts and the corresponding products. I suggest you read the back of the bag and follow along. I do have a tip, though. I found that it's much easier to get the melts to, well, melt more evenly if I stand the bag up (making sure it has the "plug" tip on the coupler) in a microwave safe coffee cup.


Once your chocolate is melted, use the fine point decorating tip to carefully trace the details in the molds with the accent color (black for the skeleton heads, white for the spiderwebs). This will take some practice to get it done right. Don't expect these to come out looking perfect. Let the chocolate in the mold harden slightly before applying the next set, to make sure that it doesn't wind up getting squished up all weird.

The next step is to carefully fill the mold half way up with the ribbon decorating tip, making sure to fully reach the edges. Tap the mold gently on the work surface to work out any air bubbles, and gently press a sandwich cookie into each mold cavity. I recommend filling one cavity with chocolate, tapping it, and then sticking the cookie in, to make sure that the chocolate doesn't harden too much in the meanwhile.


The rest is quite simple. Pop the molds into the fridge for about 10 minutes or until the chocolate is hardened, and then pop the chocolate-covered cookies out like the same way you would ice from an ice tray, adding light pressure to the back of the cavity as needed. Be careful not to collapse the cavity, as you'll damage the mold. 

How did yours turn out? Be sure to let us know in the comments below! Also, this week is our Halloween recipe rush, so be sure to like us on Facebook and follow us on Twitter to make sure you don't miss a single one.

Thursday, October 27, 2016

Halloween Recipe Rush Day 5: Pumpkin Spice Cotton Candy

Welcome to Day 5 of our Halloween Recipe Rush! We've got a special in store for you today. It's a bit of a long story, but many moons ago, I wound up landing a good deal on a cotton candy maker. I then proceeded to look around for the flossing sugar for it, but instead found myself wandering across an obscure corner of eBay, which, of all things, gave instructions for mixing cotton candy sugar at home. After a lot of experimentation and the release of seasonal ingredients, I finally figured out how to get decent results on a pumpkin spice variety.


Ingredients: 

  • 2c Granulated Sugar
    • This is the regular old "white" table sugar that looks like salt.
  • 2tsp Liquid Pumpkin Spice Flavoring/Extract
    • I like to use Lorann Pumpkin Spice Baking Emulsion. Just make sure that your flavoring doesn't contain any particulate matter, because it'll interfere with the flossing process, as the particulate matter won't melt like the sugar will.
  • Food Coloring

Equipment:
  • Mixer With Bowl
    • Trust me, you'll want a high-speed stand mixer for this, because trying to use a hand-held mixer and get everything added in properly while holding the bowl to keep it from achieving low earth orbit is a nightmare.
  • Cotton Candy Maker
    • The one I use is the Nostalgia Electrics Retro Red model. It's served me quite well.
  • Cotton Candy Cones
    • My cotton candy maker came with a set of reusable plastic cones, but you can either buy paper ones, or make your own out of printer paper. I'm personally not too fond of eating off of office supplies, but that's just me.
  • Rubber Spatula

****Before you even think about making cotton candy, check your weather forecast first. High humidity or impending rain make it a nightmare to try to and spin the sugar out properly. ****


Put all of the sugar into the bowl of the mixer, and turn the mixer to medium high. Make sure it's not spitting sugar everywhere. Carefully add the flavoring a drop at a time while the mixer is running, being sure to land the flavoring into the sugar and not onto the side of the bowl. Give the mixer plenty of time to get it mixed in before adding the next drop. You'll want to stop the mixer and scrape the sides and bottom of the bowl every few drops. Follow suit with the food coloring. I found that a general ratio of 2:1 yellow to red works well. You'll want to dye the sugar much darker than you want the cotton candy to be, as the cotton candy is mostly air, and will ultimately make whatever color the sugar is become a vaguely pastel shade.


Make sure you get all the dye mixed in.
As you can see, I missed a spot and had to take
it back for more mixing.

Once the sugar is fully mixed (note that it will be kind of like castle sand in consistency), turn on the cotton candy machine, and let it come up to temperature. Then add the manufacturer-recommended amount of sugar to the extractor head. Mine is a smaller household cotton candy maker rather than an industrial one, so for me, the recommended amount was 1tbsp. 


This part will take some patience, but wait for the sugar to start forming strands around the edge of the machine bowl. When they've accumulated enough to be "cottony," gently place the cone over the bowl and twirl it slowly, allowing the cotton candy to grab on to the cone. Keep twirling, making sure not to point the cone downward into the bowl, picking up more strands as they form. This will take some practice to get right, so don't expect your first few cones to look perfect. Once the cotton candy ball is sufficiently sized, switch to a new cone. When the sugar strands start to slow down, add more sugar into the extractor head.

Any cotton candy that you're not immediately eating needs to be stored in a zippered plastic baggie, or else it will quickly draw moisture from the air and become a sticky mess. Same thing with the sugar itself. Unused sugar is fairly shelf stable. 

Cotton candy is always fun for Halloween, because you can totally skip the food coloring and pretend it's spiderwebs, or make what looks like giant ear cleaning swabs. The sugar itself is also quite tasty and can be used on its own for decorating or adding flavor. It goes amazingly as "sprinkles" on top of anything with frosting.

How did yours turn out? Be sure to let us know in the comments below! Also, this week is our Halloween recipe rush, so be sure to like us on Facebook and follow us on Twitter to make sure you don't miss a single one.

Wednesday, October 26, 2016

Halloween Recipe Rush Day 4: Pumpkin Patch Cake

Hey everyone! It's Day 4 of our Halloween Recipe Rush, and let me tell you, it's been an awesome week. We've broken several records here at Epic Feasts over the last few days for viewership, post likes, etc., and it's all thanks to you, my dear readers! The bigger my reader base, the more often I'll be able to post recipes, so if you like what I do, be sure to share it with your friends!

Today we've got something that can easily be the centerpiece of your table, and is quite easy to make. Done right, your Pumpkin Patch Cake will quickly be the life of the party.


Ingredients:

  • 2 Boxes Light-Colored Cake Mix
    • White cake mix works well, as does any of the Yellow or Butter varieties.
  • Whatever The Cake Mix Boxes Call For
  • White Frosting
    • Premade works well, but if you make your own, make sure it comes up to the same consistency as the store-bought stuff.
  • Green, Yellow, and Red Food Coloring
  • Spray Grease
  • 2tsp Pumpkin Spice Extract
    • I like to use LorAnn Pumpkin Spice Bakery Emulsion. You could likely get away with using a mixture of spices, but I'm not 100% on the amount to use. Best of luck.

Equipment:

  • Large Mixing Bowl
  • Small Microwave Safe Mixing Bowl
  • 2 Stir Spoons
  • Bundt Pan
  • Cooling Rack
  • Oven
  • Cake Tester
    • I actually like to use this onion holder thing that I got a while back that has a lot of spikes on it, so I can get a good sampling of what's really going on inside the cake, because with my luck, if I use a single-spike tester, I always wind up hitting that one bit that's done when the rest of the cake is raw.
  • Cookie Sheet

The first thing you'll want to do after preheating the oven to 350F (325F for dark pans) is fully grease up your Bundt pan. Yes, even if it's a silicone pan. Just trust me on this one. Don't over do it on the grease, otherwise the outside of your cake will fry and get all crunchy, but make sure you cover all of the inside of the pan, especially around the center post. Set the pan aside for the time being

In the large mixing bowl, mix up both of the cake mixes according to the directions on the box. After it's fairly smooth, you're going to dye the cake mix orange and add the flavoring. If you started off with a yellow cake mix, it'll take less yellow dye to get it the right hue. Start of with a little bit of dye at first, because you can always add more. Trying to take the dye back out? Well... that's another story entirely. For "white" cake mixes, a ratio of 2 drops yellow to 1 drop red usually works, adding in increments of that until the batter is the right color.

Regardless of if your Bundt pan is silicone or not, I recommend placing it on a baking tray (cookie sheet) for ease of migration. Evenly distribute the batter in the Bundt pan, trying to keep any of it from getting on the center post. It's not the end of the world if the batter winds up there, but I'd recommend wiping it off, as it'll burn while cooking and be all crunchy-weird. Your Bundt pan should be a little over half way full.


Now, this is a double cake, so it'll take more time than a regular cake would to bake. I think mine took around 45 minutes on convection mode, in a silicone pan. Metal pans may cook differently. I'd say start with 20 minutes and test it in 10 minute intervals. Be sure to poke the cake tester into the "thickest" part of the cake ring. 

Once the cake is fully done, pull it out and let it cool off. While it's cooling, put the frosting in the microwave safe bowl, and microwave it in 10 second intervals, stirring in between, until it becomes just barely "soft" and easily stirrable. Stir in enough green food coloring to make the frosting a vibrant green.

Once the cake pan is cool enough to safely handle bare handed, but is still warm, hold the cooling rack over the top of it and gently flip the two of them over as one unit. Set the combined pieces on your work surface, and then gently try to lift the pan off from both sides at the same time. Mine actually came off quite easily, but I've used silicone bakeware a lot and am used to greasing it properly. If your pan (silicone or not) doesn't come off easily, gently vibrate the pan while applying even pressure around the edges. If your pan is silicone, you can try to gently peel it off / push the bottom inward. Be careful, as you don't want to rip your cake.

Once the cake has cooled completely, transfer it to a serving dish using both hands and drizzle the frosting over the top. You can microwave the frosting again for just a bit if it has hardened back up, but be careful not to make it too runny.  It's worth noting that the outside of the cake will be slightly brownish once it comes out of the pan, but the inside will be wonderfully orange, and looks beautiful when cut.

How did yours turn out? Be sure to let us know in the comments below! Also, this week is our Halloween recipe rush, so be sure to like us on Facebook and follow us on Twitter to make sure you don't miss a single one.

Tuesday, October 25, 2016

Halloween Recipe Rush Day 3: Midnight Magic Moon Pops

Welcome to Day 3 of our Halloween Recipe Rush. Before we get started, I just wanted to say a quick "hi!" to our readers in India and Brazil. We've apparently been gaining some traction there recently. It always amuses me to read through my blog audience stats, because I honestly never thought I'd have an international audience. When I started this, I figured maybe at best I'd get a few friends reading my posts. Thanks for proving me wrong!

Tonight's recipe is specially chosen so that your children (if you have any) can pitch in and help out, and will definitely enjoy the results. Midnight Magic Moon Pops!


Ingredients:


  • White Chocolate Pudding
    • I used Hershey's White Chocolate instant pudding mix, but you can totally use pre-made out of the cups or cans. You can also use vanilla if you like, but I personally prefer the chocolate, especially since it has a better coloration for this purpose.
  • Mini M&M's Candy
    • You all saw what I did there. Although you could totally use Reeses Pieces. Don't ask me to come up with a witty name for that one, though.

Equipment:

  • Ice Ball Mold
    • You can totally get away with nearly anything that you're willing to freeze, but the shape will be much less moon-like.
  • "Sticks"
    • I wound up using some "treat sticks" that I found at my local Michaels store. Anything that will slide all the way through the hole in the ice ball maker will work, if you're using an iceball maker. I do advise testing it first, otherwise you're going to wind up with the awkward situation of all of your moon pops conjoined with the top half of the ice ball mold. Yes, I may have found this out the hard way.
  • Mortar and Pestle
    • A meat mallet or rolling pin will also work well, just bag the candies first. And not in one of the cheap baggies either... it's likely to burst and spew candy bits all over the place.
  • Piping Bag With Tip
    • You can use a plastic baggie minus the corner, but the piping tip makes the pudding much easier to control.

Take about a cup of Mini M&M's Candy and smash them up in the mortar & pestle (or other methods), being careful not to smash them up too small. You'll want the color bits to still be visible. Go too Hulk-smash on them, and you'll wind up with chocolate powder, which is specifically why I didn't recommend a food processor. Believe it or not, I actually had to call my Dad for help with using the mortar and pestle, because it had been so long and I apparently now suck at smashing things with it. Once you've got them smashed, gently mix them into the pudding.


With the ice ball maker open, place a few whole Mini M&M's Candy pieces. From here, you're going to load the pudding mixture into the piping bag and fill the bottom half of each ice ball to just below the "equator" of the mold. Pack a few more Mini M&M's Candy pieces in on top, being careful not to push the pudding up and over the edge of the mold.


Optimists will see this mold as half full. Pessimists will see it as
half empty. Me? I'm a realist. I see them as delicious.


Carefully seal on the top half of the ice ball mold. Make sure it's all the way on properly, otherwise you're going to wind up with Magic Saturns instead of Magic Moons. Fill the rest of the ice balls up through the hole in the top, using the piping bag. Once you think you have them full, channel your inner paint shaker and gently vibrate the ice ball molds for about a minute, ideally making sure you gently tap it against your work surface each time. You'll notice that this will force the pudding to settle, and you'll have to "top off" the ice cavities.

Place your "sticks" in through the hole in the top of the mold, and pop the whole operation into the freezer over night. Don't get impatient and start squeezing the pops to see if they're done... that causes them to become misshapen. Yes, I'm guilty as charged. Moving along.

So I got a bit over zealous and over filled some of them. Oh well.


After they've frozen solid, all you've got to do is get the moon pops out of the mold. That's much easier said than done, I know. You'll have to gently pry all the way around the top half of the mold, being careful not to dislodge the sticks. It's totally the sticks that causes the problem here, otherwise you could just rip the top of the mold off like a wax strip. Ow... that hurts just thinking about it. Once you have the top off, the bottoms are much easier. Just gently press the bottom of each cavity upward, and the pop will come right out.

How did yours turn out? Be sure to let us know in the comments below! This week is our Halloween recipe rush, so be sure to like us on Facebook and follow us on Twitter to make sure you don't miss a single one.