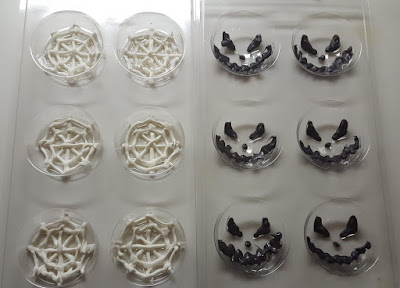
Today we're going to go with something inspired by that nostalgic old movie, The Nightmare Before Halloween.
Ingredients:
- Sandwich cookies
- I used Oreo cookies. Your standard grocery store Oreo knockoffs will work. Or pretty much any cookie about the same size.
- White Almond Bark or Wilton Candy Melts
- Black Almond Bark or Wilton Candy Melts
- For ease of writing, hence forth both colors of this will be referred to as "chocolate"
Equipment:
- Candy Molds
- The ones I used here are two Celebrate It molds that Michaels sold with their Halloween seasonal stuff this year. If you can't get ahold of these or something similar, you can freehand the chocolate directly onto the cookies. Just apply the chocolate in reverse order from what's listed below.
- Microwave Safe Piping Bags and Microwave Safe Candy Decorating Tips
- Wilton has you covered. Pick up some of their disposable piping bags and this tip set. Whatever you do, do not use conventional metal piping tips in your microwave. You're cooking here, not making a Michael Bay film.
- Tall Microwave-Safe Coffee Cup
Wilton is great, really. They have instructions on how to properly melt and use their candy melts and the corresponding products. I suggest you read the back of the bag and follow along. I do have a tip, though. I found that it's much easier to get the melts to, well, melt more evenly if I stand the bag up (making sure it has the "plug" tip on the coupler) in a microwave safe coffee cup.
Once your chocolate is melted, use the fine point decorating tip to carefully trace the details in the molds with the accent color (black for the skeleton heads, white for the spiderwebs). This will take some practice to get it done right. Don't expect these to come out looking perfect. Let the chocolate in the mold harden slightly before applying the next set, to make sure that it doesn't wind up getting squished up all weird.
The next step is to carefully fill the mold half way up with the ribbon decorating tip, making sure to fully reach the edges. Tap the mold gently on the work surface to work out any air bubbles, and gently press a sandwich cookie into each mold cavity. I recommend filling one cavity with chocolate, tapping it, and then sticking the cookie in, to make sure that the chocolate doesn't harden too much in the meanwhile.
The rest is quite simple. Pop the molds into the fridge for about 10 minutes or until the chocolate is hardened, and then pop the chocolate-covered cookies out like the same way you would ice from an ice tray, adding light pressure to the back of the cavity as needed. Be careful not to collapse the cavity, as you'll damage the mold.


No comments:
Post a Comment